No one wants to see flashing lights in their rearview mirror, especially for something as preventable as a burnt-out bulb. A faulty license plate light is an easy reason for a police officer to pull you over, leading to a frustrating and completely avoidable ticket. Taking a few minutes to handle a license plate light replacement yourself can save you both time and money. It’s a straightforward fix that doesn’t require special skills or an expensive trip to the shop. We’ll walk you through the simple process, so you can get back on the road with confidence and peace of mind.
Key Takeaways
- Your license plate light is a safety feature: Keeping this light working is not just about following the law to avoid a ticket; it also ensures your vehicle is clearly visible to other drivers in low-light conditions.
- Replacing the bulb is an easy DIY project: You can usually complete this task in minutes with just a screwdriver, but always handle the new bulb with gloves to prevent skin oils from shortening its lifespan.
- Troubleshoot simple problems before calling a pro: If a new bulb doesn’t light up, check for a blown fuse or corrosion in the socket. If the issue seems more complex, or you’re simply short on time, letting an expert handle it is a smart choice.
What Is a License Plate Light and Why Does It Matter?
It’s easy to overlook the small details on your car, but some of them, like the license plate light, play a surprisingly big role. This tiny bulb, usually located in a small housing just above your rear license plate, has one simple job: to illuminate your plate so it’s visible at night. While it might not seem as critical as your headlights or brake lights, a functioning license plate light is essential for two major reasons. First, it keeps you compliant with traffic laws, helping you avoid unnecessary fines and traffic stops. Second, it’s a key part of your vehicle’s overall safety system, ensuring your car is clearly identifiable to others on the road, especially in low-light conditions. Taking a moment to check this light is a small step that makes a big difference in your daily drive.
Staying on the Right Side of the Law
Let’s be honest, no one wants to get pulled over for something as minor as a burnt-out bulb. But the reality is, license plate lights are required by law in most places. Driving without a working one can easily lead to a traffic stop and an unwanted ticket. Think of it as one of the simplest ways to keep your driving record clean and avoid a frustrating interruption to your day. While specific vehicle equipment laws can vary from state to state, having a visible license plate is a universal expectation. Checking this light regularly is a proactive step that saves you both money and hassle down the road.
How It Keeps You Safe on the Road
Beyond just following the rules, your license plate light is a practical safety feature. At night or during poor weather, these lights help other drivers see your vehicle and gauge its distance, contributing to better nighttime driving safety for everyone. A clearly lit plate makes your car more identifiable to law enforcement and other drivers, which is crucial in an emergency or if your vehicle is ever stolen. It’s a small component that works with your tail lights to create a complete picture of your car’s presence for those sharing the road with you. Ensuring it works is a simple way to enhance your visibility and contribute to a safer driving environment.
Is Your License Plate Light Out? Here’s How to Tell
A burnt-out license plate light is one of those small car issues that’s incredibly easy to miss. Unlike a headlight, you don’t rely on it to see where you’re going, so you might not notice it’s out until someone else points it out, often a police officer. Since a functioning license plate light is a legal requirement in every state, it’s a good idea to know how to spot a problem before it leads to an unwanted traffic stop.
The good news is that checking your license plate light is simple and takes less than a minute. You don’t need any special tools or knowledge, just a moment to walk to the back of your car. Making this a regular habit can save you the headache of a ticket and ensure your vehicle is safe and visible to others on the road. Here are a couple of straightforward ways to check if your light is working properly.
Look for These Telltale Signs
Honestly, the most common sign of a burnt-out license plate light is getting pulled over, and nobody wants that hassle. To stay ahead of the game, it’s best to be proactive. If your tag lights are out, you need to replace them quickly to stay compliant with traffic laws. You might occasionally spot the issue yourself at night, perhaps by catching your car’s reflection in a storefront window or in the bumper of the car behind you at a stoplight. But since it’s a detail you won’t notice in the daytime, making a point to check it specifically is the most reliable way to catch a problem early and keep your car street-legal.
A Quick Way to Test Your Light
Here’s a foolproof way to check your light. First, park your car in a safe spot and put on the emergency brake. Next, turn your key to the accessory position (the setting that lets your radio play without the engine running) and switch on your headlights. This action also turns on the license plate lights. Then, simply walk to the back of your vehicle and take a look. You should see a clear, white light illuminating your plate. It’s a good practice to regularly check all your vehicle’s lights to make sure they’re working. If you’d rather leave it to a professional, this is one of the 85 points we inspect during a Mobile Car Care Quick Check.
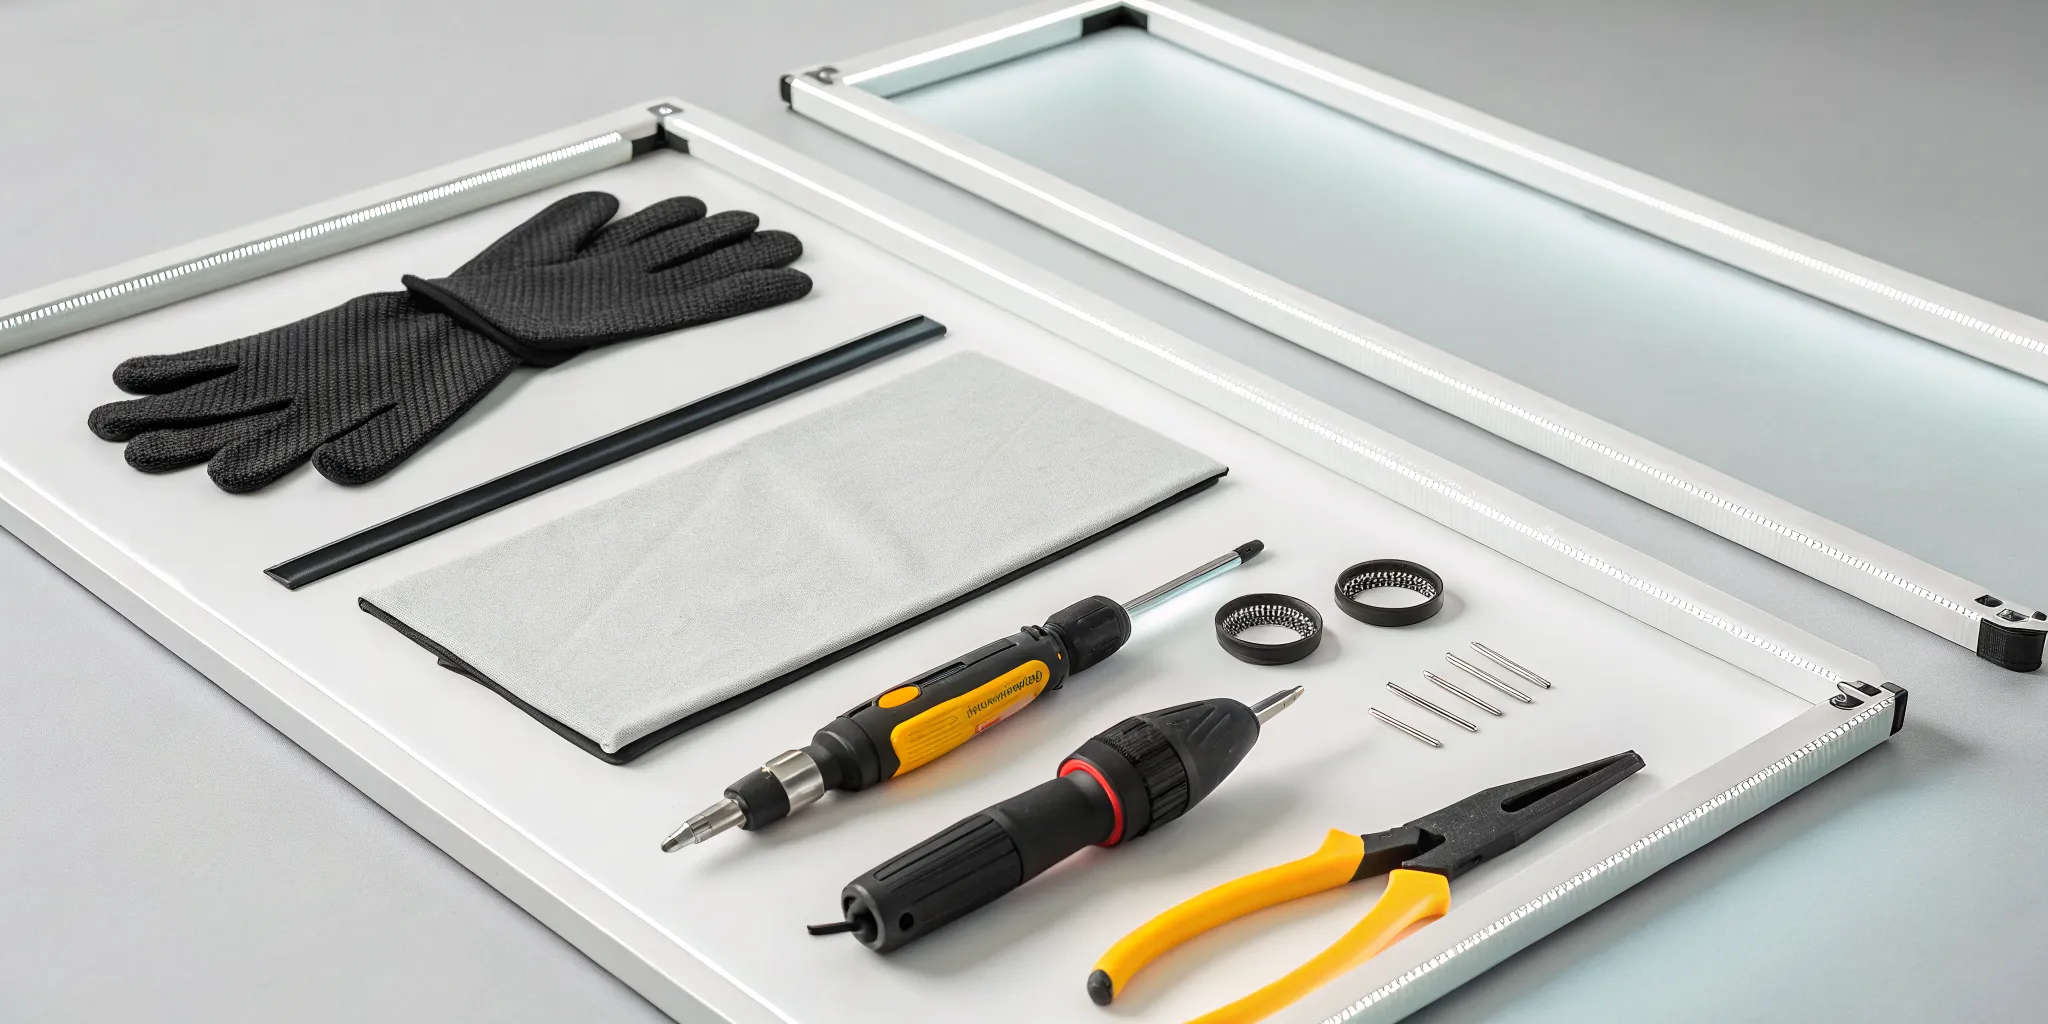
Gather Your Tools: What You’ll Need for the Job
Before you get started, let’s talk about tools. The good news is you won’t need to wheel out a giant toolbox for this project. Replacing a license plate light is a straightforward task that only requires a few basic items you might already have. Getting everything ready beforehand makes the job go smoothly and keeps you from running back and forth to the garage. Think of it as your pre-flight check. With the right tools and the correct bulb in hand, you’ll be done in no time.
Your Simple Tool Checklist
You don’t need much to tackle this job. Your primary tool will likely be a Phillips head screwdriver, which is used to remove the small screws holding the light cover in place. Some cars might use a flathead screwdriver or even a small socket wrench, so it’s a good idea to peek at the light assembly first to see what you’re working with. I also recommend grabbing a pair of gloves. They’ll keep your hands clean and prevent the oils from your skin from getting on the new bulb, which can shorten its lifespan. Finally, a soft cloth is handy for wiping down the lens cover before you put it back on.
Find the Right Bulb for Your Car
This is the most important part of your prep work. License plate bulbs aren’t one-size-fits-all, so you need to get the specific type your car requires. The easiest way to do this is by checking your owner’s manual, which should list all the bulb types for your vehicle. If you can’t find your manual, you can usually find the right bulb by searching online with your car’s make, model, and year. Another simple option is to remove the old bulb first and take it with you to an auto parts store. They can match it up for you and ensure you leave with the correct one.
A Quick Note on Safety Gear
Even for a quick fix like this one, safety should always come first. Before you do anything, make sure your car is turned off and the keys are out of the ignition. This eliminates any risk of a mild electric shock while you’re handling the wiring and bulb socket. It’s also a good idea to wear a pair of safety glasses, just in case a piece of old, brittle plastic decides to snap. Taking these small precautions is a key part of any good vehicle maintenance routine, whether you’re doing it yourself or having a pro handle it. It’s this focus on proactive care that keeps your car running safely for years to come.
How to Replace Your License Plate Light in 5 Steps
Alright, you’ve got your tools and your new bulb, so you’re ready to tackle this quick fix. Replacing a license plate light is one of the easiest DIY car maintenance tasks out there, and it usually takes just a few minutes from start to finish. It’s a fantastic way to get more comfortable working on your own vehicle without the risk of a major mistake. Plus, handling it yourself saves you a trip to the shop and gives you that satisfying feeling of a job well done. We’ll walk through this process together, step by step.
The whole thing is very straightforward, and most cars follow the same basic design for these lights, so you won’t need any specialized knowledge. The key is to be patient and gentle, especially with the plastic parts like the light cover, as they can become brittle over time. Don’t rush it. Following these five simple steps will guide you through the entire replacement, from making sure you’re working safely to testing the new bulb. With a little care, you’ll have that light working again and your car will be ready for the road. Let’s get started.
Step 1: Put Safety First
Before you even think about touching the light, make sure your car is turned completely off and the keys are out of the ignition. This is the most important step because it prevents any chance of an electric shock while you’re working. You’re dealing with your car’s electrical system, and while it’s low voltage, it’s always best to be cautious. Taking a moment to ensure the vehicle is off is a simple habit that keeps you safe during any car repair, big or small.
Step 2: Access the Light Assembly
Now, let’s get to the light itself. The bulb is housed inside a plastic cover, or lens, located right above your license plate. You’ll likely see one or two small screws holding it in place. Using your Phillips screwdriver, carefully turn the screws counter-clockwise to remove them. Be sure to put them somewhere safe, like in your pocket or a magnetic tray, so they don’t get lost. Once the screws are out, the lens assembly should come off easily. Some models might use clips instead of screws, so you may need to gently pry the cover off with a flathead screwdriver.
Step 3: Remove the Old Bulb
With the cover off, you’ll see the small bulb sitting in its socket. To remove it, gently grip the bulb and pull it straight out. It shouldn’t require much force. If it feels stuck, you can give it a very slight wiggle back and forth as you pull. This is a crucial part of the process to replace a license plate light, so take your time to avoid breaking the bulb in the socket. Once the old bulb is out, you can set it aside for proper disposal.
Step 4: Install the New Bulb
Time for the new bulb. Take your replacement bulb and carefully push it into the empty socket until it clicks or feels securely seated. It’s a good idea to avoid touching the glass part of the new bulb with your bare fingers, as oils from your skin can create hot spots and shorten its lifespan. Once the bulb is in, place the plastic lens cover back over it and line up the screw holes. Re-insert the screws and tighten them with your screwdriver until they are snug, but be careful not to overtighten and crack the plastic.
Step 5: Test and Reassemble
You’re almost done! Before you put your tools away, it’s time for a quick function check. Get in your car, turn the key to the “on” position, and switch on your headlights. This should also activate the license plate lights. Hop out and take a look to make sure your new bulb is shining brightly. If it’s working, you’re all set! Turn the car and lights off. If you had to remove any part of the trunk liner or other components to get to the light, now is the time to put everything back together.
Common Mistakes to Avoid
Even a straightforward task like changing a light bulb can have a few tricky spots. Knowing about these common slip-ups ahead of time can save you a lot of frustration and make the whole process go smoothly. Think of this as your friendly guide to getting the job done right the first time, so you can avoid that “oops” moment of having to undo all your hard work. These are simple things, but they make a huge difference between a quick fix and an afternoon of headaches.
Don’t Touch the Glass
This might sound a little strange, but you should avoid touching the glass part of the new bulb with your bare hands. The natural oils on your skin can transfer to the bulb, creating hot spots on the surface when it heats up. This uneven heating can cause the bulb to burn out much faster than it should. To prevent this, always handle the new bulb with clean gloves or a lint-free cloth. It’s a tiny step that helps your new bulb live its longest, brightest life.
Avoid Forcing Parts
When you’re removing the lens cover or the bulb socket, everything should come apart with gentle pressure. If you find yourself needing to use a lot of force, stop what you’re doing and take another look. You might have missed a hidden clip or a screw. Forcing a part can easily lead to cracked plastic or broken tabs, which is a much bigger problem than a burnt-out bulb. Car components are designed to fit together perfectly, so if it feels like a fight, you’re likely missing a step.
Double-Check Your Bulb Type
There’s nothing more frustrating than getting everything apart only to realize you bought the wrong replacement bulb. Before you even buy a new one, check your vehicle’s owner’s manual to find the exact type you need. Bulbs come in many different sizes and styles, and one that looks “close enough” probably won’t work. Taking a minute to confirm the correct part number will save you a return trip to the auto parts store and ensure a perfect fit.
Always Test Before You Finish
Once you’ve popped the new bulb into the socket, but before you reattach the lens cover and put your tools away, take a moment to test it. Turn on your car’s headlights to make sure the new license plate light illuminates properly. This quick check confirms that the bulb is working and seated correctly in the socket. If it doesn’t light up, it’s much easier to troubleshoot the issue now rather than after you’ve put everything back together.
New Bulb, Still No Light? How to Troubleshoot
It’s frustrating when you go through the trouble of replacing a bulb, only to find the light still isn’t working. Don’t throw in the towel just yet. When a new bulb doesn’t solve the problem, it usually points to an issue with the electrical system, like a blown fuse or a bad connection.
Before you start worrying about a major repair, there are a few simple things you can check yourself. Working through these steps can help you pinpoint the real cause of the problem. And if you find you’re in over your head, that’s okay too. Knowing when to call for backup is just as important as knowing how to change a bulb. Let’s walk through what to look for next.
Check the Simple Stuff First
Before diving into the wiring, let’s start with the easiest potential culprit: the fuse. Your car has a fuse box (sometimes two) that protects its electrical components. Your owner’s manual will show you where it’s located and which fuse corresponds to the license plate lights. Pull out the correct fuse and hold it up to the light. If you see a broken or melted wire inside the plastic, you’ve found your problem. You can find replacement fuses at any auto parts store. Just make sure you get the right amperage. If the fuse looks fine, double-check that the new bulb is seated securely in the socket. Sometimes it just needs a little wiggle to make a solid connection.
Inspect the Wiring and Connections
If the fuse is good and the bulb is secure, the next step is to look at the socket and the wires connected to it. Over time, moisture and dirt can cause corrosion inside the light socket, preventing electricity from reaching the bulb. Look for any rust, green or white buildup, or debris. You can often clean this out with a small wire brush. Next, give the wires a gentle tug to make sure they are firmly connected. Visually inspect them for any cracks, fraying, or bare spots. A problem with the wiring can be a bit more complex, and it’s often the point where a simple DIY fix can turn into a bigger headache.
Know When to Call for Help
If you’ve checked the fuse, cleaned the socket, and still can’t find an obvious issue with the wiring, it’s time to call a professional. Electrical problems can be tricky to diagnose without the right tools, and guessing can lead to more significant issues. There’s no shame in handing the job over to an expert. In fact, it’s the safest and smartest move. Instead of spending your weekend trying to track down a faulty wire, you can have a certified technician come right to your driveway. A Quick Check can diagnose the electrical issue and get your lights working again, giving you total peace of mind without the hassle.
Keep Your License Plate Lights Working Longer
Now that you’ve replaced your license plate light, you probably don’t want to do it again anytime soon. The good news is that with a little bit of proactive care, you can extend the life of your bulbs and keep your car safe and street-legal. These simple habits don’t take much time but can save you the hassle of another replacement down the road. Think of it as easy, preventative maintenance that keeps your vehicle in top shape.
Make It Part of Your Routine Check
The easiest way to stay on top of your license plate lights is to simply look at them every once in a while. You don’t need to schedule a formal inspection; just make it a habit to glance at them when you’re walking to your car at night or loading groceries into the trunk. Regularly checking your license plate light bulb ensures it’s working and helps you catch a problem before it leads to a ticket. If you prefer a more hands-off approach, our Essential Plan includes comprehensive wellness checks that cover all your vehicle’s lighting.
Simple Cleaning and Care Tips
When you handle a new bulb, the natural oils on your skin can cause hot spots on the glass, leading it to burn out prematurely. To avoid this, always use clean cotton gloves or a lint-free cloth when installing a new bulb. This simple step prevents smudges and damage that could shorten its lifespan. It’s also a good idea to occasionally wipe the plastic lens cover with a damp cloth. Removing road grime and dirt allows the light to shine brightly and keeps the assembly clean, which can help prevent moisture from getting inside.
Considering an LED Upgrade?
If you find yourself replacing the same bulb often, it might be time for an upgrade. Upgrading to LED lights is a great option because they use less power and last significantly longer than traditional incandescent bulbs. They also produce a brighter, cleaner light, which improves visibility for other drivers. Just make sure to choose white lights, as this is a legal requirement in most places. An LED upgrade is a small investment that pays off with better performance and fewer replacements, giving you one less thing to worry about.
When to Let a Pro Handle It
While changing a license plate light is a great DIY project for many car owners, there are times when calling in a professional is the best move. It’s not about admitting defeat; it’s about making a smart decision for your car, your safety, and your schedule. If you find yourself struggling with a tricky installation, facing a more complex electrical issue, or simply don’t have the time to spare, letting an expert take over can save you a lot of frustration. Knowing when to pass the torch is just as important as knowing how to do the job yourself. Sometimes, the most efficient fix is the one you don’t have to do.
If It’s More Than Just a Bulb
You’ve followed the steps perfectly, installed the new bulb, and it still won’t turn on. This is a classic sign that the problem runs deeper than a simple burnout. When a new bulb doesn’t solve the issue, it often points to a problem with your car’s wiring, the socket, or a fuse. Electrical systems can be complex, and trying to diagnose them without the right tools or knowledge can lead to bigger problems. A professional technician can quickly trace the source of the electrical fault and repair it correctly, ensuring everything works safely and reliably.
When You’re Short on Time
Let’s be honest, life gets busy. Between work, family, and everything else on your plate, finding even 30 minutes for car maintenance can feel impossible. If your schedule is packed, you don’t have to choose between driving with a burnt-out light and sacrificing your precious time. This is where convenience becomes key. Instead of driving to a garage and waiting, a mobile service can handle the replacement right in your driveway or office parking lot. Our Quick Check plan is perfect for getting these small but important tasks done without disrupting your day.
For Total Peace of Mind
Sometimes, you just want the confidence of knowing a job was done right, without any second-guessing. If you’re not comfortable working on your car or simply prefer to leave it to an expert, that’s a perfectly valid reason to call for help. A professional handles the entire process, from sourcing the correct bulb to ensuring the housing is reassembled securely. This way, you can be sure your vehicle is compliant and safe on the road. For comprehensive care that covers all the bases, our Total Care plan provides complete maintenance checks for ultimate assurance.
Related Articles
- Monthly Car Inspection Checklist for Students – Mobile Car Care
- Check Engine Light On? 6 Reasons Why & What to Do – Mobile Car Care
- Why Is My TPMS Light On? A Complete Guide – Mobile Car Care
- Alternator Replacement: Symptoms, Cost & Guide – Mobile Car Care
Frequently Asked Questions
Can I really get a ticket for a burnt-out license plate light? Yes, you absolutely can. While it might seem like a minor issue, every state requires your license plate to be illuminated and visible at night. A non-working light gives law enforcement a valid reason to pull you over, which can result in a fix-it ticket or a fine. Checking this light is a simple way to avoid an unnecessary and frustrating traffic stop.
What’s the easiest way to find the right bulb for my car? The most reliable method is to check your car’s owner’s manual, which will list the specific part number for every bulb. If you don’t have the manual handy, you can pull out the old bulb and take it with you to an auto parts store. The staff there can match it to the correct replacement, ensuring you get exactly what you need without any guesswork.
I put in a new bulb, but it’s still not working. What should I check first? If a new bulb doesn’t solve the problem, the most common culprit is a blown fuse. Your owner’s manual can show you where the fuse box is and which fuse protects the license plate lights. If the fuse looks good, the next step is to inspect the bulb socket for any corrosion or dirt that might be blocking the connection.
Are LED lights a better option for my license plate? Upgrading to LED bulbs is a great idea if you want a longer-lasting solution. LEDs use less energy, shine brighter, and have a much longer lifespan than standard incandescent bulbs, meaning you won’t have to replace them as often. Just be sure to purchase them in white, as colored license plate lights are illegal in most areas.
Why would I need a mobile service for such a small job? While this is a great DIY task, sometimes life just gets in the way. A mobile service is perfect for when you’re short on time, don’t feel comfortable doing the repair yourself, or if the problem turns out to be more complex than just a bulb. We can handle the fix in your driveway while you focus on your day, offering total convenience and peace of mind.